This page:


Replacing The Cam Belt And Water Pump On An Alfa Giulia/Stelvio 2.2 Diesel
The centrifugal filter needs replacing at the same time as the cam belt as this is positioned behind the auxiliary tensioner. This 'How to' is based on the Giulia.
Workshop Time: 2hrs 30mins
Cam belt kit 6000629053, water pump 46345839 and centrifugal kit.
If you would like to book yourself into the workshop, the price of this repair on a Giulia is £691.35
 | Remove the plastic engine cover. |
|
 | Unplug the MAFF sensor and undo the x4 7mm bolts to the lid of the air filter housing. |
|
 | Remove the air filter and undo the 10mm bolt at the head of the housing. |
|
 | To take off the auxiliary belt use a 15mm spanner on the bolt of the tensioners idler and rotate clockwise to release the tension. |
|
 | Undo the T50 (TORX) bolt to the auxiliary tensioner. |
|
 | The auxiliary idler is an E10 (female TORX). |
|
 | Remove the protective centre cover to the bottom pulley and undo the x4 T45. |
|
 | The small cover behind the pulley has x4 4mm Allen bolts. |
|
 | Unplug the DPF sensor and remove the sound deadening foam on top of the engine. |
|
 | Unbolt the x3 10mm bolts to the electrical conduit on the cam belt plastic cover (there's also a clip at the bottom/left which tends to snap) then the x7 T40 bolts to the cover. |
|
 | On the alloy cover undo the lower x2 13mm bolts and the x3 15mm upper bolts. |
|
 | Unplug the fuel pressure sensor. |
|
 | The turbo oil feed pipe has a T45 at each end (on reassembly replace the banjo seals). |
|
 | Turn the 19mm crank pulley bolt clockwise so that the white indicator on the pulley is near the bottom.... |
|
 | ...and the exhaust cam shaft pulley indicator is about 2.00pm on a clock face. |
|
 | Undo the 8mm Allen bolts to the 'inspection' hole on both the camshafts. |
|
 | Looking down the exhaust camshaft inspection hole rotate the crank clockwise until a 'flat spot' appears, keep rotating until the flat spot is completely open. |
|
 | Now screw in the camshaft locking tools on both camshafts. |
|
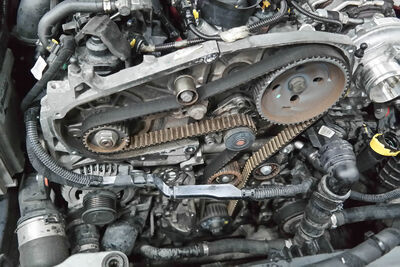
 | Remove the 10mm bolt left facing of the driving pulley and assemble the crank locking tools as in the picture. |
|
 | Undo the 12mm bolt to the cam belt tensioner and the 15mm large idler beside it. |
|
 | The small idler is 13mm. |
|
 | Remove the x18 T30 screws to the undertray and drop the undertray down. |
|
 | Undo the x4 T40 screws to the centrifugal cover (this is where the auxiliary tensioner bolts to). |
|
 | Replace all x3 seals to the cover. |
|
 | Remove the centrifugal filter by undoing the T25 screw (we've put a socket in place for you to see). |
|
 | Replace the new designed filter (on the right) and it's cover. |
|
 | Place a large tray underneath the engine to catch the coolant and undo the x3 Allen bolts to the water pump. |
|
 | When we fit the new water pump and gasket we add a little gasket sealant |
|
 | Fit the new idlers and tack the new tensioner (so it can still slide). |
|
 | Top up the coolant then bleed the system by unscrewing the bleed valve by the turbo. |
|
Related Links: Replacing the fuel filter | Oil and filter change | Fixed price servicing
